4th Grade
4th GradE WorkshoP
Teaching coding is no easy feat, and you’ve done an exceptional job at it this school year! This workshop is designed to help you continue building your confidence with the 9 Dots curriculum during the second half of the year. We’ll begin by reviewing key coding concepts in your grade level’s curriculum, followed by dedicated planning time to ensure you are well-prepared to lead your upcoming coding lessons. Finally, we’ll provide a sneak peek of what’s to come in the Module 3 project your students will work on by the end of the year. As you go through this workshop, use our Graphic Organizer to take notes along the way.
Review Coding Concepts
In module E, students are introduced to conditionals in the first module. In the second module, students learn to define and call functions to create reusable code.
Module 1 - Conditionals
A conditional is code that runs depending on whether a boolean1. statement is true or false. It is also known as an “if-then” statement and can be read as “If ____, then ___”.
Watch the video below to learn more about conditionals in PixelBots:
Try solving this conditionals challenge below!
Loops
A loop is a programming structure that repeats a sequence of code. When approaching a challenge, students should be looking for patterns in the image of the goal such as squares or lines. These patterns can be efficiently replicated using a loop.
Watch the video below to learn more about loops in PixelBots:
Try solving this loops challenge below!
💡 Add key vocabulary terms or note any challenges students faced with conditions or loops to your handout.
Module 2 - Functions II
moveTo
Students will be introduced to the ‘moveTo’ block. This block instructs the Pixelbot to move to a specific pixel on the grid using the x and y coordinates.
In coding, a function is a tool that allows you to define a sequence of code to perform a specific task and reuse it multiple times.
You can think of it like putting a recipe in a cookbook. Instead of researching the ingredients every time, you write the recipe once in your cookbook. A function performs in a similar way where you define a sequence of code to perform a task once and then use it repeatedly by calling its name.
This process is “defining the function.” After defining, you use the function by “calling” it’s name in your main code, telling the computer to execute the pre-written steps, just like using a recipe from your cookbook.
When using a function you are looking to identify a pattern that repeats at different locations on the grid.
When you're coding with functions, there are two important steps to follow:
First, you define the function based on what you want to achieve in the challenge.
Second, you write a function call. This call tells the computer to use the code inside the defined function. Without a function call, the computer won't run the code.
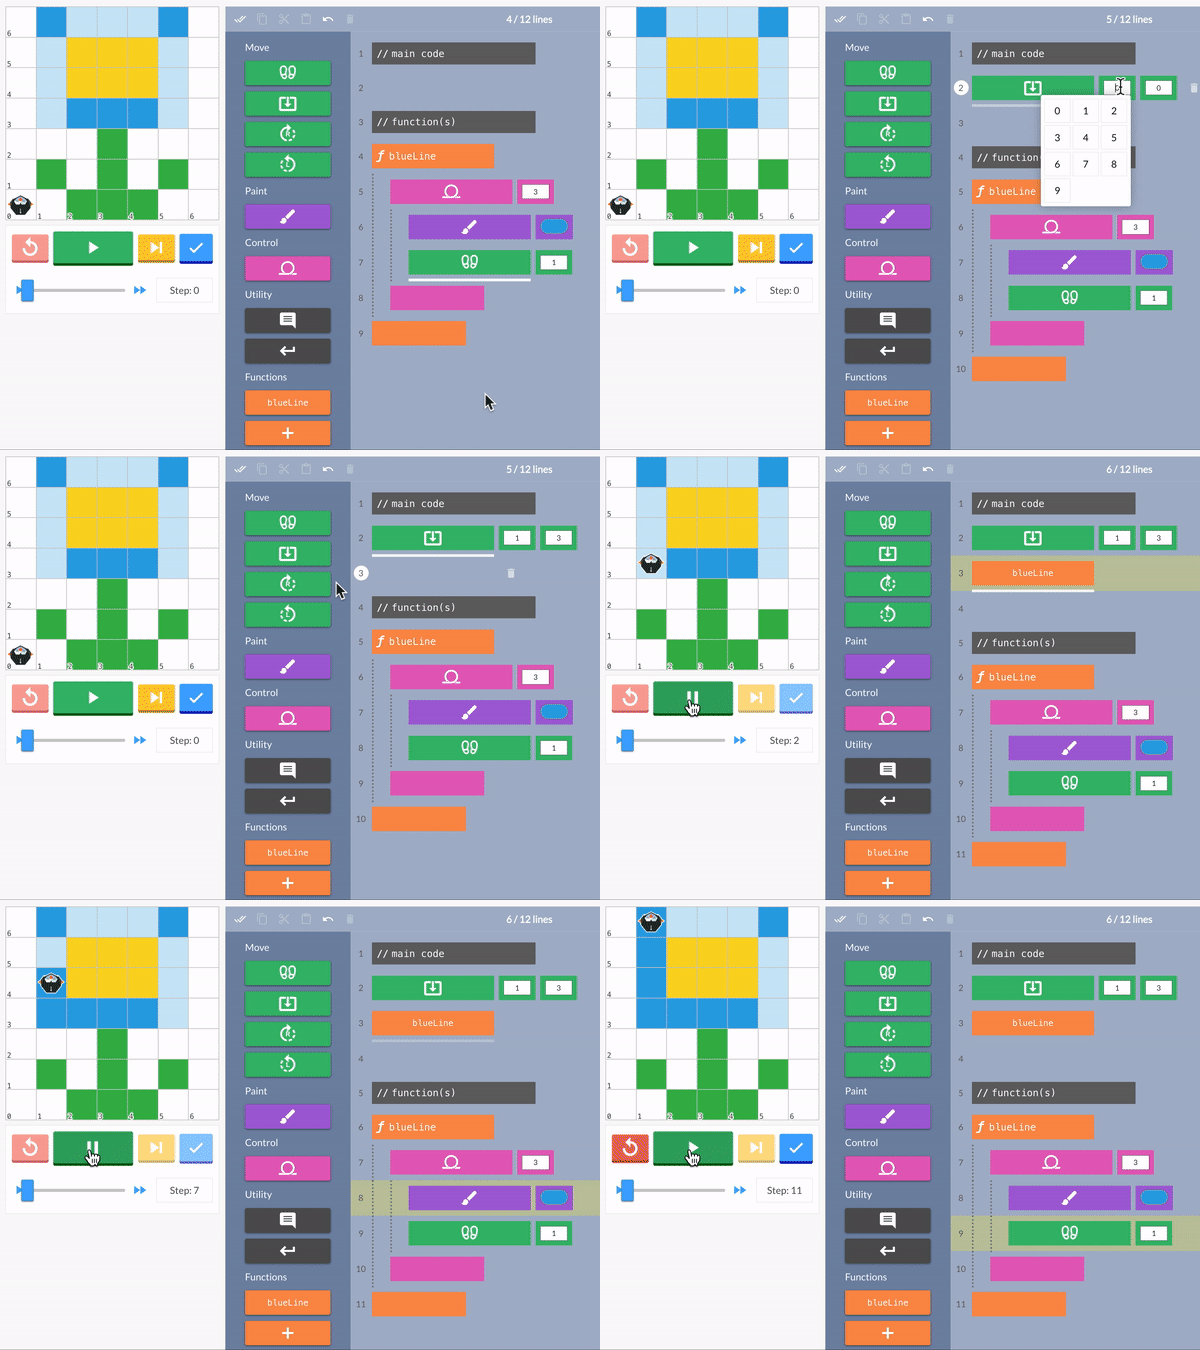
In this challenge, we will need to create three blue lines to complete the image. Therefore, first, we will define a function which creates a blue line.
Next, we call the function in the main code above to paint each blue line.
Try solving this functions challenge below!
💡 Which challenge type(s) could be the trickiest for your students? Write down ways you can support them, or list questions you have for your Coding Coordinator on your handout.
Review Lessons & Create Your Action Plan
Prepare for your upcoming lessons by reviewing lesson materials and creating an Action Plan. Start by reviewing the lesson plan, slideshow, and challenges, and then decide which section(s) of the lesson you’ll lead or co-lead with your coordinator.
💡 Use the Graphic Organizer for step by step instructions to create your Action Plan
Preview Module 3: Paint-ahoy
With any remaining time you have, take a sneak peek at the project your students are building up to!
In Module 3, students will code functions and conditionals to design maps for playing a Battleship-like game called Paint-ahoy. Students will play Paint-ahoy in teams, also referred to as “crews”. Students from opposing crews will play several rounds of Paint-ahoy to earn points for their crew. The game consists of materials such as a deck of challenge cards and planning grids. At the end of Lesson 05 and 10, the winning team will be decided. Here is a Paint-ahoy Overview, and the curriculum breakdown is as follows:
Lessons 1 & 2:
Students are introduced to the context, setting, and rules of the game
Practice creating ships, coding, attacks, and understanding the game flow
Lessons 3 & 4:
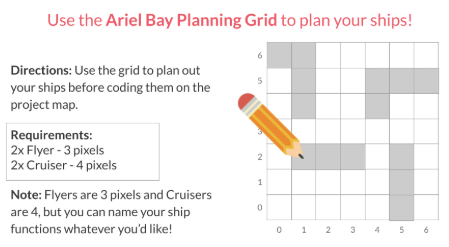
Strategize where to place their ships using the Ariel Bay & Tantan Sea planning maps. Please print the maps & distribute them to each student.
Try it out yourself by following this link to code an Ariel Bay Planning Grid on a computer: tinyurl.com/ArielBayMap
Lesson 05:
Students from opposing teams battle it out and play 2 rounds on each map they created.
Please print the following materials:
Paint-ahoy Card Set (1 set for each group of 2 students)
Strategy Grids (1 per student)
Lessons 6-10
Repeat the same process outlined above, only this time students play a new version of the game called Color Splash.
You can take a deeper look at this module by reviewing the Scope and Sequence here, or via the 9 Dots platform.
Survey
Thank you for attending our Semester II PD! We take teacher feedback seriously, please take our survey here.
Additional Resources
Looking for more coding practice?
For more practice please log onto the 9 Dots platform and try our Teacher Certification Modules. These modules will prepare you to lead and learn alongside your students.
Find additional resources at https://www.9dots.org/teacher-guide
Footnotes
[1] Boolean is a true or false statement.


